First Aid Wrist Injury

First aid – Wrist Injury

Overview:

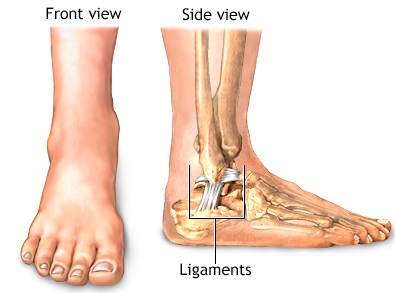
The wrist is made up of the two bones of the forearm (the radius and ulna) and eight carpal bones (scaphoid or navicular, lunate, triquetrum, pisiform, trapezium, trapezoid, capitate, and the hamate). Many ligaments connect these bones to each other.

A sprain is an injury to the wrist ligaments without any evidence of bone injury (that is, no broken bones or cracks in the bone). With a sprain, there is usually only a partial tearing of the ligaments. In a severe wrist sprain, there can be a complete tear.

A fractured or broken wrist means there is a break or a crack in one or more of the bones of the wrist.

A strain is where there is a tearing of the muscle fibers in the area surrounding the wrist.

Definition:

A sprain is an injury to a ligament. Ligaments are strong bands of connective tissue that connect one bone to another.

A wrist sprain is a common injury. There are many ligaments in the wrist that can be stretched or torn, resulting in a sprain. This occurs when the wrist is bent forcefully, such as in a fall onto an outstretched hand.

Alternative Names:

Transverse wrist fracture; Dinner-fork deformity of the wrist.

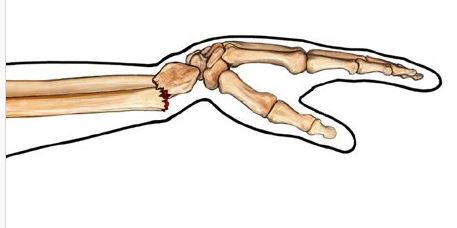
Types of wrist injury:

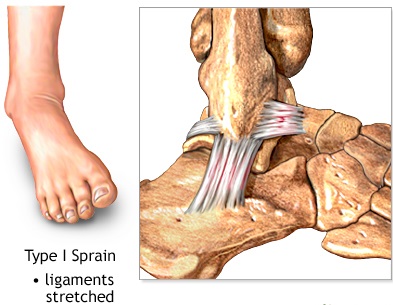
Wrist sprains can range from mild to severe. They are graded, depending on the degree of injury to the ligaments.

  • Grade 1: These mild sprains occur when the ligaments are stretched, but not torn.
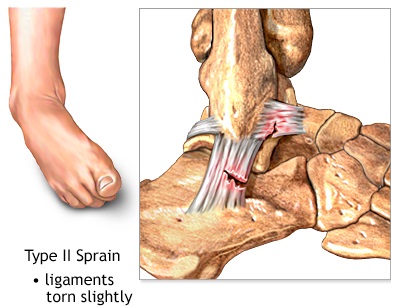
  • Grade 2: These moderate sprains occur when the ligaments are partially torn. Grade 2 sprains may involve some loss of function.
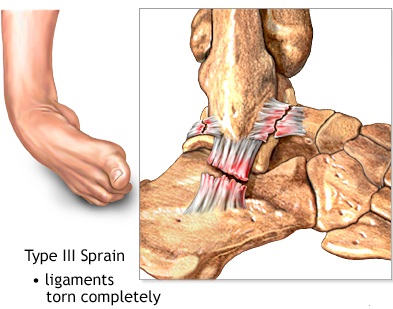
  • Grade 3: These severe sprains occur when the ligament is completely torn. These are significant injuries that require medical or surgical care. As the ligament tears away from the bone, it may also take a small chip of bone with it, called an avulsion fracture.

Causes:

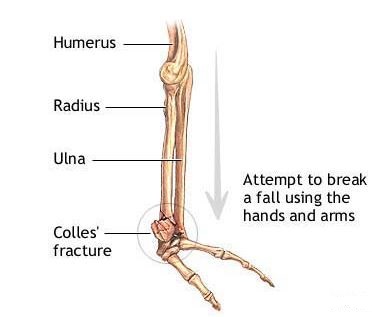
This injury usually occurs when a person attempts to break a fall by throwing the hands and arms out in front of them. The hands meet the ground with the body weight behind them. The radius and ulna (the bones in the forearm) may buckle or break just above the wrist.

This injury is more likely to happen during sports such as rollerblading, skateboarding, running, or any other activity in which a forward fall can occur while a person is moving at a higher speed.

Bones become more brittle (from osteoporosis) in adults ages 50 – 60 and older. Older adults are more likely to fracture a bone, even while walking slowly.

The most common cause of wrist injuries is a fall on an outstretched hand:

  • You can also have wrist pain from repetitive use that results in an inflammation of the tendons (tendonitis). This is termed a repetitive motion injury and is really not a true sprain.
  • Carpal tunnel syndrome is another common wrist injury that may occur from repetitive motion.
  • High force or weight through the wris.
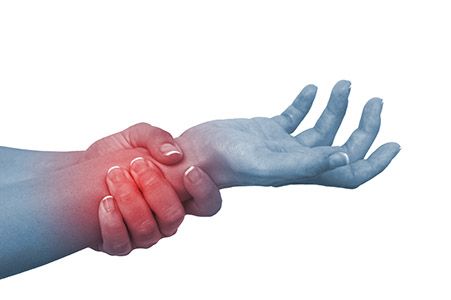
Symptoms:

Symptoms of a wrist sprain may vary in intensity and location. The most common symptoms of a wrist sprain include:

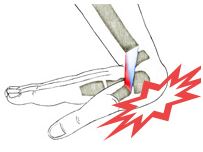
  • Swelling in the wrist.
  • Pain at the time of the injury.
  • Persistent pain when you move your wrist.
  • Bruising or discoloration of the skin around the wrist.
  • Tenderness at the injury site.
  • A feeling of popping or tearing inside the wrist.
  • A warm or feverish feeling to the skin around the wrist.

Sometimes, a wrist injury may seem mild with very little swelling, but it could be that an important ligament has been torn that will require surgery to avoid problems later.

Similarly, an unrecognized (occult) fracture may be mistakenly considered a mild or moderately sprained wrist. If left untreated, the broken bone may not heal and will require a surgery that could have been avoided with early, appropriate treatment. The most common example of this is an occult fracture of the scaphoid bone.

It is important in all but very mild cases for a doctor to evaluate a wrist injury. Proper diagnosis and treatment of wrist injuries is necessary to avoid long-lasting stiffness and pain.

First Aid:

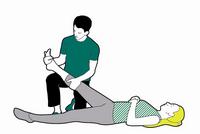
  • Reassure the injured person.
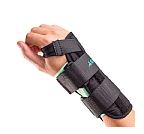
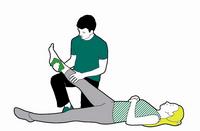
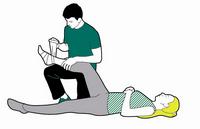
  • Place the hand and wrist in a splint in a normal resting position.
    • Place a rigid splint on the underside of the wrist, hand, and forearm.
    • Place a padded object such as a sock, wadded cloth, or rolled elastic bandage in the palm.
    • Wrap the wrist, hand, splint, and padded object. Do not wrap too tightly, and keep the fingertips uncovered.
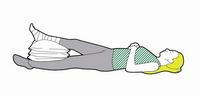
  • Elevate the wrist or place it in a sling.
  • Use an ice pack over the wrist to help reduce swelling.
  • Bring the person to an urgent care center or emergency medical facility.
  • Do NOT attempt to move or straighten the wrist or hand.
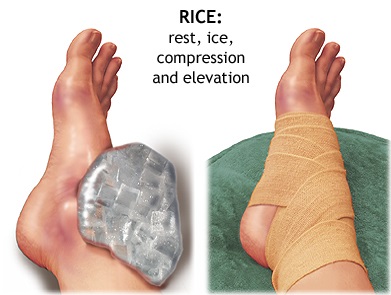
RICE Method:

Mild wrist sprains can usually be treated at home with the RICE protocol.

  • R Rest the joint for at least 48 hours.
  • I Ice the injury to reduce swelling.
    Do not apply ice directly to the skin. Use an ice pack or wrap a towel around the ice or a package of frozen vegetables. Apply ice for about 20 minutes at a time.
  • C Compress the swelling with an elastic bandage.
  • E Elevate the injury above the level of the heart.

A pain reliever, such as aspirin or ibuprofen, may be helpful. If pain and swelling persist for more than 48 hours, however, see a doctor.

When to Seek Medical Care:

If you have severe pain, deformity, numbness, or are unable to move your wrist, you should call your doctor for an immediate appointment, go to an urgent care clinic, or go to a hospital’s emergency department.

If there is no deformity and the pain is manageable with over-the-counter pain medication, you may want to wait 12-24 hours before deciding whether to call the doctor. If symptoms persist after a day, see a doctor.

If you have obvious deformity, numbness, or severe pain, you need medical attention.

  • If there is obvious deformity or severe swelling, there may be a broken bone that needs to be moved back into its normal position.
  • There also can be a dislocation where the bones are no longer in the correct position, although they are not broken.

Considerations:

Wrist fractures are common among children and the elderly.

  • Children’s bones are soft and tend to get buckle (torus) fractures. These are incomplete fractures on one side of the bone.
  • Because bones become brittle with age, a complete fracture is more likely in adults and among the elderly. This is called a Colles’ fracture.

Fractures that are not severe may be placed in a splint and sling, or a lightweight, fiberglass cast.

If the bone is no longer straight because of the fracture, it must be reduced (straightened).

  • The health care provider may be able to use local anesthesia and reduce the fracture.
  • In other cases, surgery may be needed. The break may need to be fixed with a plate and screws, pins, or other metal or plastic hardware.

Older people with Colles’ fractures often fail to regain full mobility of the wrist joint. Carpal tunnel syndrome may occur as an early or late complication of the injury. Chronic pain may result from injury to the ligaments or the joint surface of the wrist.

Prevention:

The following tips may prevent finger, hand, and wrist injuries.

  • Do exercises that strengthen your hand and arm muscles.
  • Learn safe hand and wrist movements to avoid an injury.
  • Reduce the speed and force of repetitive movements in activities such as hammering, typing, knitting, quilting, sweeping, raking, playing racquet sports, or rowing.
  • Change positions when you hold objects, such as a book or playing cards, for any length of time.
  • Use your whole hand to grasp an object. Gripping with only your thumb and index finger can stress your wrist.
  • Consider wearing gloves that support the wrist and have vibration-absorbing padding when working with tools that vibrate.
  • Use safety measures, such as gloves, and follow instructions for the proper use of hand and power tools.
  • Use caution when using knives in preparing food or craft activities. Supervise a child using knives or sharp scissors in craft activities.
  • Wear protective gear, such as wrist guards, in sports activities. Be sure to learn what you can do to help prevent injuries for your child too.
  • Review your work posture and body mechanics.
    • Organize your work so that you can change your position occasionally while maintaining a comfortable posture.
    • Position your work so you do not have to turn excessively to either side.
    • Keep your shoulders relaxed when your arms are hanging by your sides.
    • When using a keyboard, keep your forearms parallel to the floor or slightly lowered, and keep your fingers lower than your wrists. Allow your arms and hands to move freely. Take frequent breaks to stretch your fingers, hands, wrist, shoulders, and neck. If you use a wrist pad during breaks from typing, it’s best to rest your palm or the heel of your hand on the support, rather than your wrist.

Home treatment for a minor hand or wrist injury:

Home treatment may help relieve pain, swelling, and stiffness.

  • Remove all rings, bracelets, or any other jewellery that goes around a finger or wrist. It will be harder to remove the jewellery later if swelling increases.
  • Use rest, ice, compression, and elevation (RICE) for pain and swelling.
  • Do not use your injured hand or wrist for the first 24 hours after an injury, if possible. An elastic bandage can help decrease swelling. The wrap will also remind you to rest the injured hand or wrist. A wrist splint can help support an injured wrist. Talk to your doctor if you think you need to use a splint or bandage for more than 48 to 72 hours.
  • Gently massage or rub the area to relieve pain and encourage blood flow. Do not massage the injured area if it causes pain.
  • For the first 48 hours after an injury, avoid things that might increase swelling, such as hot showers, hot tubs, hot packs, or alcoholic beverages.
  • After 48 to 72 hours, if swelling is gone, apply heat and begin gentle exercise with the aid of moist heat to help restore and maintain flexibility. Some experts recommend alternating between heat and cold treatments.
  • Treat blisters.

Keep your bones strong:

  • Eat a nutritious diet with enough calcium and vitamin D , which helps your body absorb calcium. Calcium is found in dairy products, such as milk, cheese, and yogurt; dark green, leafy vegetables, such as broccoli; and other foods.
  • Exercise and stay active. It is best to do weight-bearing exercise, such as walking, jogging, stair climbing, dancing, or lifting weights, for 2½ hours a week. One way to do this is to be active 30 minutes a day, at least 5 days a week. In addition to weight-bearing exercise, experts recommend that you do resistance exercises at least 2 days a week. Talk to your doctor about an exercise program that is right for you. Begin slowly, especially if you have not been active. For more information, see the topic Fitness.
  • Limit how much alcohol you drink.
  • Don’t smoke or use other tobacco products. Smoking puts you at a much higher risk of developing osteoporosis. It also interferes with blood supply and healing. For more information, see the topic Quitting Smoking.

Basic first aid- Treament for wrist injury

Taping to stabilise your wrist painful

First Aid Tonsillitis

Tonsillitis

Your tonsils are two infection-fighting centers located in the way back of your throat, one on the right another on the left. These bundles of lymphatic tissue work hard to keep you from getting sick ‘catching’ germs and bacteria that enter the body through the mouth and nose – but sometimes even they get infected. This infection is called tonsillitis. Tonsillitis can be caused by both bacterial and viral infections –including the Epstein – Barr virus (EBV) which is responsible for causing the Mononucleosis infection.

Symptoms:

The symptoms of tonsillitis are similar to many of the other throat related infections- sore throat, strep and mono- all of which may end up leading to tonsillitis. If you are currently suffering from one of those illnesses, it may be important to pay special attention to your tonsils and keep yourself aware of the symptoms of tonsillitis

  • Sore throat
  • Fever or chills
  • Difficulty swallowing (eating, drinking, swallowing saliva)
  • Swollen glands
  • Swollen or red tonsils (redder than normal)
  • White patches on tonsils
  • Whitish or yellowish discharge coming from tonsils, or covering them.
  • Bad breath
  • Loss of voice, or other changes to voice
  • Headache

Usually tonsillitis is not serious, but left untreated it can lead to deeper and more complicated problems. Pus discharges may build up and become abscesses which may then cause breathing difficulties or spread the infection to your bloodstream or into the neck or chest- this, however, is very rare. If any of the following symptoms are present, see a doctor immediately!

  • High fever (over 103 degrees F)
  • Symptoms of tonsillitis persisting over 48 hours
  • Exposure, or possible exposure to the strep throat bacteria
  • Worsening sore throat pain
  • Severe headaches
  • Chest pain
  • Vomiting
  • Skin rashes
  • Severe difficulty swallowing (or fear of dehydration due to inability to swallow easily)
  • Difficulty breathing

Treatment:

There are several options when it comes to tonsillitis treatment- all dependent on the type of infection.

Bacterial infections are often easily treated by a prescribed batch of antibiotics. If the person suffering is a child and cannot easily swallow pills, the antibiotics may be given as an injection instead. These powerful drugs are usually taken over a course of 10 days- and it is important to finish off the entire dosage you are prescribed, even if you feel better!! Not finishing the antibiotics may allow the infection to return, stronger, meaner, and resistant to the first antibiotic- requiring stronger drugs.

  • Viral infections are treated without medications- and are generally allowed to run their course. Usually the person feels better within a week or two. If symptoms persist longer than two weeks, seek medical help. Tips on how to relieve the discomfort can be found below.
  • Drink lots of fluids! Warm and cool- these fluids will sooth your throat, and more importantly, keep you properly hydrated. Avoid drinks with caffeine as they will assist dehydration.
  • Get lots of rest! Resting will give your body the ample time and energy it needs to heal itself.
  • Avoid solid foods that might irritate your throat, or be painful to eat. Ice creams, jello, soups, applesauce and other soft foods are cool. Crackers, spicy foods, and anything hard or crunchy are bad ideas.
  • Over the counter pain relievers such as ibuprofen (Advil), Acetaminophen (Tylenol) or Aspirin. REMEMBER Aspirin should Never be given to children!!

Surgery:

Sometimes, if a child is experiencing recurrent bouts of tonsillitis, or the tonsillitis is so severe that they are having extreme difficulty eating or breathing the doctor will decide to remove the tonsils- a tonsillectomy. Your child may be eligible for this minor surgery if they fit into any of the following categories

  • 7 or more infections of tonsillitis in one year
  • 5 or more infections a year for two years
  • 3 or more infections a year for three years
  • Tonsillitis that recurs despite antibiotic treatment

Extreme hindrance of breathing or swallowing due to the swelling and irritation of tonsils.

The surgery is minor, and the child can usually go home the day of the operation. However, it takes about two weeks to totally recover and the child will be very prone to contracting infection during this time, so caution should be taken (prevention tips given below). There will also be a good amount of throat tenderness and very soft and cool foods (such as ice creams, applesauce, and jello) will help soothe and ease this discomfort. In some cases, ear pain is also noticed following the surgery. A cool mist humidifier kept in the child’s room may also help to keep them comfortable, but it should be cleaned and changed daily- if they are left to sit, and simply refilled they may become a breeding ground for bacteria and mold.

Prevention:

The best way to prevent the spread of infectious diseases is to know how to properly wash your hands, and also how frequently. Star teaching your children early the importance of washing their hands more often then just before meal times and after using the restroom.

If you have a child or family member who is sick, make sure they know how to properly protect everyone around them by washing their hands every time after sneezing or coughing (with their hands in front of their mouths to prevent the airborne spread of germs) or wiping their nose.

To wash everything they eat off of or drink from with soapy hot water, not to share drinks or food, to keep in mind that you should keep other household items clean or disinfected after using them- this can include phones, doorknobs, blankets, and so forth.

In families with young children, elderly people, or others who might have weakened immune systems, properly controlling the spread of germs is particularly important.

First Aid Tick Bites

First aid – Tick bites

Introduction:

Ticks are small spider like animals (arachnids) that bite to fasten themselves onto the skin and feed on blood. Ticks live in the fur and feathers of many birds and animals. Tick bites occur most often during early spring to late summer and in areas where there are many wild animals and birds.

Most ticks don’t carry diseases, and most tick bites don’t cause serious health problems. But it is important to remove a tick as soon as you find it. Removing the tick’s body helps you avoid diseases the tick may pass on during feeding. Removing the tick’s head helps prevent an infection in the skin where it bit you. See Home Treatment for the best way to remove a tick.

Usually, removing the tick, washing the site of the bite, and watching for signs of illness are all that is needed. When you have a tick bite, it is important to determine whether you need a tetanus shot to prevent tetanus (lock jaw).

Definition:

Ticks are small, insect-like creatures that can attach to you as you brush past bushes, plants, and grass. Once on you, ticks often move to a warm, moist location, like the armpits, groin, and hair. At that point, they typically attach firmly to your skin and begin to draw blood. Ticks are important as they can transmit bacteria that cause illness.

Ticks can be fairly large — about the size of a pencil eraser — or so small that they are almost impossible to see.  There are approximately 850 different types of ticks. Ticks can cause a variety of health conditions ranging from harmless to serious.

Alternative Names

Poisonous Ingredient

Hard- and soft-bodied female ticks are believed to make a poison that can cause tick paralysis in children.

Some people may have an allergic reaction to a tick bite. This reaction may be mild, with a few annoying symptoms. In rare cases, a severe allergic reaction (anaphylaxis) may occur.

Many of the diseases ticks carry cause flu-like symptoms, such as fever, headache, nausea, vomiting, and muscle aches. Symptoms may begin from 1 day to 3 weeks after the tick bite. Sometimes a rash or sore appears along with the flu-like symptoms.

Common tick-borne diseases include:

  • Lyme disease.
  • Rocky Mountain spotted fever.
  • Tularemia.
  • Ehrlichiosis.
  • Relapsing fever.
  • Colorado tick fever.
  • Babesiosis.

Tick paralysis is a rare problem that may occur after a tick bite. In some parts of the world, tick bites may cause other tick-borne diseases, such as South African tick-bite fever.

Symptoms:

Watch for the symptoms of tick-borne diseases in the weeks following a tick bite — muscle or joint aches, stiff neck, headache, weakness, fever, swollen lymph nodes, and other flu-like symptoms. Watch for a red spot or rash starting at the location of the bite.

The symptoms below refer more to the problems resulting from the bite itself, not the diseases that a bite may cause. Some of the symptoms are specific to one variety of tick or another, but not necessarily common to all ticks.

  • Apnea (breathing stopped)
  • Blisters
  • Difficulty breathing
  • Rash
  • Severe pain at bite site (some varieties), lasting for several weeks
  • Swelling at bite site (some varieties)
  • Weakness
  • Uncoordinated movement

First off there are three kinds of ticks you need to worry about:

Brown dog ticks: These are the most widespread ticks, as they can be found all over the world. Luckily these ticks prefer dogs to people, so humans are rarely bit by them. Unluckily if your pet has a large infestation of them, they risk suffering from anemia.

American dog ticks: These ticks are most abundant in eastern North America and usually bite humans, dogs, and wildlife. These ticks are known to carry the organism that causes Rocky Mountain Fever.

Lone star ticks: These ticks are found from TX to OK, eastward to the Atlantic coast, and from Mexico to Central and South America. These ticks are also known to pass along Rocky Mountain Fever.

Deer ticks: These are the guys to watch out for. Found all over America deer ticks are usually found on white tailed deer, and are then spread to humans who pass though an area frequented by deer. These ticks are much smaller than most other ticks (which are about the size of a pencil eraser), as they are only about the size of a sesame seed.

Watch for the symptoms of these diseases in the weeks following a tick bite:

  • Fever
  • Headache
  • Muscle or joint aches
  • Other flu-like symptoms
  • Stiff neck
  • Swollen lymph nodes
  • Weakness

First Aid:

If a tick is attached to you, follow these steps to remove it:

  1. Grasp the tick close to its head or mouth with tweezers. Do not use your bare fingers. If needed, use a tissue or paper towel.
  2. Pull it straight out with a slow and steady motion. Avoid squeezing or crushing the tick. Be careful not to leave the head embedded in the skin.
  3. Clean the area thoroughly with soap and water. Also wash your hands thoroughly.
  4. Save the tick in a jar and watch carefully for the next week or two for signs of Lyme disease.
  5. If all parts of the tick cannot be removed, get medical help. Bring the tick in the jar to your doctor’s appointment.

Prevention:

Wear protective clothing whenever possible when traveling through terrain which is known to harbor ticks. Inspect your skin and clothing after being outdoors where ticks are known to be present, and remove them as discussed above. Also inspect any household pets which have been in tick-infested areas.

  • Wear long pants and long sleeves when walking through heavy brush, tall grass, and densely wooded areas.
  • Pull your socks over the outside of your pants to prevent ticks from crawling up inside.
  • Keep your shirt tucked into your pants.
  • Wear light-colored clothes so that ticks can be spotted easily.
  • Spray your clothes with insect repellent.
  • Check your clothes and skin frequently while in the woods.

After returning home:

  • Remove your clothes and thoroughly inspect all skin surface areas, including your scalp. Ticks can quickly climb up the length of your body.
  • Some ticks are large and easy to locate. Other ticks can be quite small, so carefully evaluate all black or brown spots on the skin.
  • If possible ask someone to help you examine your body for ticks.
  • An adult should examine children carefully.

Call immediately for emergency medical assistance if:

Call your doctor if you have not been able to remove the entire tick. Also call if in the days following a tick bite you develop:

  • A rash
  • Flu-like symptoms
  • Joint pain or redness
  • Swollen lymph nodes

Call emergency if you have any signs of:

  • Chest pain
  • Heart palpitations
  • Paralysis
  • Severe headache
  • Trouble breathing

How you avoid getting bit by a tick:

  • Tuck your pant legs into your socks or shoes and tuck your shirt into your pants. Because ticks usually climb from the ground up, this will keep them on the outside of your clothes where it will be easier to find them.
  • Wear light colored clothing. It will be easier to spot any ticks that grab on to you.
  • Put the buddy system to good use. You and your companions should inspect each other often for ticks when you are in their habitat, and do a thorough search when you return home.
  • Since ticks like to attach themselves to the head and neck, be sure you check that area out completely.
  • If you work in an area where ticks are commonly found, then avoid wearing your work clothing home, as any attached ticks could then be brought into your home.
  • Also, check any pets that go outside and frolic in grassy, brushy, or wooded areas as ticks may be transferred from them to you.
  • And lastly wear insect repellents. DEET repellents (DEET no more than 30%) can be applied to the skin, and a stronger Permeation tick repellent and pesticide (not allowed in some states) may be applied directly to clothing (shoes, socks, cuffs and pant legs are most effective), tents and other gear or apparel. This pesticide should last about two weeks and two laundering.

I got bit anyway, how do I remove the tick?

  • Ticks should be removed as soon as possible to avoid contracting the diseases many of them carry.
  • Using a pair of tweezers, get as close to your skin and its head as you can and slowly and gently pull the tick out.
  • If you grab and squeeze to hard then the head and mouth parts may break off and remain in your skin. If this happens then seek medical help to have them removed.
  • Once the tick has been removed, you may want to save it in a small jar to have it tested and identified. (if you chose to do this put an alcohol soaked cotton swab in with the tick for preservation purposes)
  • After this then you should wash the bite area with soap and water and apply an antiseptic ointment.

Do Not

  • Do NOT try to burn the tick with a match or other hot object.
  • Do NOT twist the tick when pulling it out.
  • Do NOT try to kill, smother, or lubricate the tick with oil, alcohol, vaseline, or similar material.

First aid video for remove a tick-1

First aid video for remove a tick-2

First Aid Sprain

First aid – Sprain

Definition:

A sprain is an injury to the ligaments around a joint. Ligaments are strong, flexible fibers that hold bones together. When a ligament is stretched too far or tears, the joint will become painful and swell.

A Dislocation is when the bone becomes separated from the joint it meets, or it pops out of it’s socket. This sometimes happens when the bone and joint are over stressed. They an also be caused by contact sports, rheumatoid arthritis, inborn joint defects, and suddenly jerking that arm or hand of a small child. Dislocation is most common in the shoulders, but fingers, hips, ankles, elbows, jaws, and even the spine are also prone to dislocation.

Causes of Sprains :

A sprain is usually caused by trauma to a joint (the space between bones). Twisting or forces overstretch the ligaments (such as hyperex tension or hyper flexion) and can cause tears in the ligament tissue, which can be graded from mild to severe depending on the amount of damage. Sprains can happen when people twist an ankle or knee or fall on an elbow or shoulder. A strain is usually the result of overstretching or overuse of muscles and tendons. An acute strain can be the result of sudden twisting or trauma to the muscles or tendons. Chronic strains are the consequence of overuse of muscles and tendons, such as with athletes who train constantly and do not rest adequately.

Both of these injuries are commonly confused with fractures (broken bones) because they all exhibit many of the same symptoms.

symptoms are:

  • Pain
  • Swelling
  • And an inability to move and bear weight
  • A misshapen appearance
  • Any discoloration

Ankle sprain – series:

Normal anatomy:

The ankle joint connects the foot with the leg. The ankle joint allows the foot to move upward and downward and in an inward and outward motion. Muscles, tendons, and ligaments surround the ankle providing the stability the ankle joint needs for walking and running.

Type I ankle sprain:

The most common way the ankle can be injured is by an ankle sprain. When an ankle is sprained ligaments on the ankle are either stretched, partially torn or completely torn. The most common type of sprain is an inversion injury, where the foot is rotated inward. Ankle sprains can range from mild, to moderate, and severe. Type 1 ankle sprain is a mild sprain. It occurs when the ligaments have been stretched or torn minimally.

Type II ankle sprain:

Type II ankle sprain is a moderate level of sprain. It occurs when some of the fibers of the ligaments are torn completely.

Type III ankle sprain:

Type III ankle sprain is the most severe ankle sprain. It occurs when the entire ligament is torn and there is great instability of the ankle joint.

Early treatment of injury:

Minor injuries like sprains may be treated at home if broken bones are not suspected. The acronym RICE is helpful in remembering how to treat minor injuries: “R” stands for rest, “I” is for ice, “C” is for compression, and “E” is for elevation. Pain and swelling should decrease within 48 hours, and gentle movement may be beneficial, but pressure should not be put on a sprained joint until pain is completely gone (one to several weeks).

First Aid:

  • Apply ice right away to reduce swelling. Wrap the ice in cloth. Do not place ice directly on the skin.
  • Wrap a bandage around the affected area to limit movement. Wrap firmly, but not tightly. Use a splint if needed.
  • Keep the swollen joint raised above your heart, even while sleeping.
  • Rest the affected joint for several days.

Aspirin, ibuprofen, or other pain relievers can help. DO NOT give aspirin to children.

Keep pressure off the injured area until the pain goes away. Most of the time, a mild sprain will heal in 7-10 days. It may take several weeks for pain to go away after a bad sprain. Your health care provider may recommend crutches. Physical therapy can help you regain motion and strength of the injured area.

Use the PRICE technique:

Protect– if possible make a splint to help immobilize the affected area. Rulers and cloth, rolled up magazines and a belt, branches and shoelaces; all types of things can be used to make a splint. This will help prevent further damage to the limb. Do not try to re-position the bone/joint while making the splint.

Rest– Avoid movement of the injured area and avoid participation in activities where you may be at risk to re-injure yourself until after the wound had had plenty of time to heal.

Ice– Use ice to minimize swelling. If no ice is available, a bag of frozen veggies is a good substitute.

Compression– An elastic or fabric bandage may help decrease swelling and ease the pain. Ask a doctor before using one and make sure the bandage is not wrapped to tightly, which would hinder circulation.

Elevation– If possible raise the injured limb up above the heart. Support the elevated limb in a sling or under a pillow or folded blanket.

How to bandage a sprain:

If someone’s sprained a joint, like an ankle, knee or elbow, you can use a bandage to support the limb.

To make sure you give the right kind of support, bend the joint slightly and then wrap the bandage in a figure-of-eight. You need to wrap it either side of the injury too, to give enough support for the whole area.

(For this example we’re going to describe how to wrap an ankle, but you can use the same method to bandage an elbow or knee).

What you need to do

  • To bandage someone’s ankle, use a roller bandage
  • First, you need to hold the ankle in a comfortable position, with the joint slightly bent
  • Start by putting the end (tail) of the bandage on the inside of their ankle. Pass the bandage over and around to the outside of the ankle, and go round one and-a-half times, so that the tail end of the bandage is firmly covered and won’t come loose.
  • Then make a figure-of-eight around the joint, wrapping the bandage diagonally above and then below the joint
  • Keep going with the figure-of-eight, but each time, only cover about two thirds of the previous layer, so that with each new layer you’re covering a third of new skin
  • Once you’ve done this several times, wrap the bandage straight around the ankle a couple of times, and then fasten the end using a safety pin, sticky tape or by tucking it in
  • As soon as you’ve finished, check their toes for circulation, by pressing their big toe nail for five seconds until it goes pale. If the color doesn’t come back within two seconds after you stop pressing, the bandage is too tight so you’ll need to loosen it and do it again. Their ankle could keep swelling after you’ve bandaged it, so keep checking their circulation every ten minutes.

Treatment for strains and sprains:

Step 1 of 4: Rest


Step 2 of 4: Ice


Step 3 of 4: Comfortable support


Step 4 of 4: Elevation


When to Contact a Medical Professional:

Go to the hospital right away or call emergency if:

  • You think you have a broken bone.
  • The joint appears out of position.
  • You have a serious injury or severe pain.
  • You hear a popping sound and have immediate problems using the joint.

Call your health care provider if:

  • Swelling does not start to go away within 2 days.
  • You have symptoms of infection, including red, warm, painful skin or a fever over 100°F.
  • The pain does not go away after several weeks.

Treatments and warnings:

Because of this, the same first aid care can be used for all three of these injuries.

  • If you suspect a dislocation do not try to put the bone back into its socket, you may only make the injury worse.
  • If you suspect a dislocation in the neck or spine be very careful and do not try to move the person yourself unless absolutely necessary, as damage may have been done to the spinal cord (which may paralyze parts of the body below the injury site.) Also, if you suspect an injury this serious call emergency immediately.
  • If the site of injury is bleeding then treat the wounds and cuts accordingly, but do not try to reset/reshape the bone or joint. Also look for signs of shock.
  • If the pulse is weak below the affected area call emergency and loosen all restrictive clothing.
  • If the person is in severe pain, or the injury is to the neck, spine, hips, or thigh bone, call emergency.
  • If the joint or bone needs to be re-positioned, do not give the person anything to eat or drink as it will put off medical treatment.
  • Remove any articles of clothing or jewelry covering the affected area, or restricting blood flow to it.
  • You may give over the counter pain medications such as acetaminophen and ibuprofen as directed by the doctor. If there is bleeding do not give aspirin because aspirin is a mild blood thinner and will delay clotting.

Prevention of Sprains :

It is possible to prevent many sprains and strains from occurring. The American Academy of Orthopedic Surgeons suggests the following to help reduce one’s injury risk:

  • Participate in a conditioning program to build muscle strength.
  • Do stretching exercises daily.
  • Always wear properly fitting shoes.
  • Nourish the muscles by eating a well-balanced diet.
  • Warm up before any sports activity, including practice.
  • Use or wear protective equipment appropriate for that sport.

In addition to the above suggestions, prevent future sprains and strains by

  • maintaining a healthy weight;
  • wearing proper-fitting shoes, designed for the specific activity;
  • keeping household areas safe to prevent falls;
  • not participating in sports or exercise if overly tired or in pain.


 First aid video for Sprains

First aid video for Sprains-2

First Aid Shock

First aid – Shock

What is shock:

Shock is what happens when the heart and blood vessels are unable to pump enough oxygen-rich blood to the vital organs of the body. Although every illness and involves shock to some degree, it can be a life threatening problem. The best way to protect people from the serious damages that shock can have on the system is to recognize the signs before the person gets into serious trouble. In most cases, only a few of the symptoms will be present, and many do not appear for some time.

Classification of shock:

Hypovolemic Shock: This form of shock is brought on by a decrease in the amount of blood vessels or other fluids in the body. Excessive bleeding from internal and external injuries, fluid loss due to diarrhea, burns, dehydration, and severe vomiting usually cause this kind of shock.

Neurogenic Shock: In the case of neurogenic shock, the blood vessels become abnormally enlarged and the pooling of the blood disallows an adequate blood flow to be maintained. Fainting is an example of this sort of shock, as the blood temporarily pools as the person stands. When the person falls the blood rushes back to the head and the problem is solved.

Psychogenic Shock: This shock is more common, and is known as a “shock like condition”. It is produced by excessive fear, joy, anger, or grief. “Shell shock” is a psychological adjustment reaction to stressful wartime experiences. Treatment for shell shock is limited to emotional support and help from a medical facility.

Anaphylactic Shock: This form of shock is brought on by an allergic reaction from a food, bee sting or other insect bite, and inhalants. For more information on the care and treatment click the link below. Anaphylactic Shock

The most common symptoms are:

  • Pale, cold, clammy and moist skin
  • Vacant or dull eyes, dilated pupils
  • Anxiety, restlessness, and fainting
  • Weak, rapid, or absent pulse
  • Shallow, rapid, and irregular breathing
  • Nausea and vomiting
  • Excessive thirst
  • Person may seem confused or tired
  • Loss of blood pressure

causes of shock:

There are several main causes of shock:

  • Heart conditions (heart attack, heart failure)
  • Heavy internal or external bleeding, such as from a serious injury or rupture of a blood vessel
  • Dehydration, especially when severe or related to heat illness.
  • Infection (septic shock)
  • Severe allergic reaction (anaphylactic shock)
  • Spinal injuries (neurogenic shock)
  • Burns
  • Persistent vomiting or diarrhea

Treatment of shock:

1. Call your local emergency help provider for help

2. Lay the victim face up, on a blanket or coat if possible, and raise the feet above the head unless they are fractured. If the person is bleeding from the mouth or vomiting, tilt their head to the side to avoid fluids going into the lungs and airways. If you are unsure of injuries keep the person laying flat.

3. Loosen tight clothing, braces, belts, jewelry etc to avoid constriction of the waist, neck and chest.

4. Keep the victim comfortable and warm enough to be able to maintain their own body heat. If possible, remove wet clothing and place blankets beneath the victim. NEVER use artificial sources of heat. If they are bleeding severely do not apply heat to the wounded area as it will prevent the blood from clotting as easily

5. Check for other injuries, such as bleeding and burns and treat the other injuries according to first aid procedures. If possible try to splint sprains or broken bones. If you are unsure of how to do this, leave them as they are to avoid further damage.

6. If they claim they are thirsty moisten their lips with water but DO NOT give them anything to drink, as it may induce vomiting.

7. Try to keep the victim calm, excitement and excessive handling will worsen their condition try to assure them help is on the way.

Remember, if you can perform these actions before shock has completely developed you may prevent its occurrence and if it had developed you may stop it from becoming fatal. If shock is left unattended to the victim will die, it is extremely important that first aid be performed as soon as possible.

Self-Care at Home:

  • Call emergency for immediate medical attention any time a person has symptoms of shock. Do not wait for symptoms to worsen before calling for help. Stay with the person until help arrives, and if possible, stay on the line with the emergency dispatcher because they may have specific instructions for you.
  • While waiting for help or on the way to the emergency room, check the person’s airway, breathing and circulation (the ABCs). Administer CPR if you are trained. If the person is breathing on his or her own, continue to check breathing every 2 minutes until help arrives.
  • Do NOT move a person who has a known or suspected spinal injury (unless they are in imminent danger of further injury).
  • Have the person lie down on his or her back with the feet elevated above the head (if raising the legs causes pain or injury, keep the person flat) to increase blood flow to vital organs. Do not raise the head.
  • Keep the person warm and comfortable. Loosen tight clothing and cover them with a blanket.
  • Do not give fluids by mouth, even if the person complains of thirst. There is a choking risk in the event of sudden loss of consciousness.
  • Give appropriate first aid for any injuries.
  • Direct pressure should be applied to any wounds that are bleeding significantly.

What is the outlook for shock?

Prompt treatment of medical shock is essential for the best outcome. Moreover, the outlook depends on the cause of the shock, the general health of the patient, and the promptness of treatment and recovery.

  • Generally, hypovolemic shock and anaphylactic shock respond well to medical treatment if initiated early.
  • Septic shock is a serious condition with a mortality rate of 24% to 50% according to some estimates. The sooner the infection is treated and fluids are administered, the greater the chances of success. Hospitals are now developing and utilizing specific protocols to identify and aggressively treat septic shock patients.
  • Cardiogenic shock has a poor prognosis, with only 1/3 of patients surviving. Because this type of shock results from injury or dysfunction of the heart it is often difficult to treat and overcome.
  • Spinal shock also has a very poor prognosis because the spinal cord mediates so many important bodily functions. There are currently very few effective treatments but medical research is making advances in the treatment of spinal injuries.

How Does Electric Shock and Lightning Work:

  • An electric shock occurs when a person comes into contact with an electrical energy source.
  • Electrical energy flows through a portion of the body causing a shock.
  • Exposure to electrical energy may result in no injury at all or may result in devastating damage or death.
  • Many people get electric shocks obtained from man-made objects such as electrical appliances, electrical wires, and electrical circuitry.
  • In addition, lightning strikes are a natural form of electric shock.
  • Burns are the most common injury from electric shock and lightning strikes.

Electric Shock Causes:

Electrical injury can be caused by:

  • Accidental contact with exposed parts of electrical appliances or wiring
  • Flashing of electric arcs from high-voltage power lines
  • Lightning
  • Machinery or occupational-related exposures
  • Young children biting or chewing on electrical cords, or poking metal objects into an electrical outlet

Symptoms:

Symptoms depend on many things, including:

  • Type and strength of voltage
  • How long you were in contact with the electricity
  • How the electricity moved through your body
  • Your overall health

Symptoms may include:

  • Changes in alertness (consciousness)
  • Broken bones
  • Heart attack (chest, arm, neck, jaw, or back pain)
  • Headache
  • Problems with swallowing, vision, or hearing
  • Irregular heartbeat
  • Muscle spasms and pain
  • Numbness or tingling
  • Breathing problems or lung failure
  • Seizures
  • Skin burns

First Aid:

1. If you can do so safely, turn off the electrical current. Unplug the cord, remove the fuse from the fuse box, or turn off the circuit breakers. Simply turning off an appliance may NOT stop the flow of electricity. Do NOT attempt to rescue a person near active high-voltage lines.

2. Call your local emergency number, such as emergency.

3. If the current can’t be turned off, use a non-conducting object, such as a broom, chair, rug, or rubber doormat to push the person away from the source of the current. Do not use a wet or metal object. If possible, stand on something dry that doesn’t conduct electricity, such as a rubber mat or folded newspapers.

4. Once the person is away from the source of electricity, check the person’s airway, breathing, and pulse. If either has stopped or seems dangerously slow or shallow, start first aid.

5. If the person has a burn, remove any clothing that comes off easily and rinse the burned area in cool, running water until the pain subsides. Give first aid for burns.

6. If the person is faint, pale, or shows other signs of shock, lay him or her down, with the head slightly lower than the trunk of the body and the legs elevated, and cover him or her with a warm blanket or a coat.

7. Stay with the person until medical help arrives.

8. Electrical injury is frequently associated with explosions or falls that can cause additional severe injuries. You may not be able to notice all of them. Do not move the person’s head or neck if the spine may be injured.

9. If you are a passenger in a vehicle struck by a power line, remain in it until help arrives unless a fire has started. If necessary, try to jump out of the vehicle so that you do not maintain contact with it while also touching the ground.

DO NOT:

Stay at least 20 feet away from a person who is being electrocuted by high-voltage electrical current (such as power lines) until the power is turned off.

  • Do NOT touch the person with your bare hands if the body is still touching the source of electricity.
  • Do NOT apply ice, butter, ointments, medicines, fluffy cotton dressings, or adhesive bandages to a burn.
  • Do NOT remove dead skin or break blisters if the person has been burned.
  • After the power is shut off, do NOT move the person unless there is a risk of fire or explosion.

Prevention:

  • Avoid electrical hazards at home and at work. Always follow the manufacturer’s safety instructions when using electrical appliances.
  • Avoid using electrical appliances while showering or wet.
  • Keep children away from electrical devices, especially those that are plugged in to an electrical outlet.
  • Keep electrical cords out of children’s reach.
  • Never touch electrical appliances while touching faucets or cold water pipes.
  • Teach children about the dangers of electricity.
  • Use child safety plugs in all electrical outlets.

Click the below link to know more in details about CPR , AED procedures and its videos

CPR

Automated External Defibrillator (AED)

First aid- Shock and bleeding

First aid- Shock