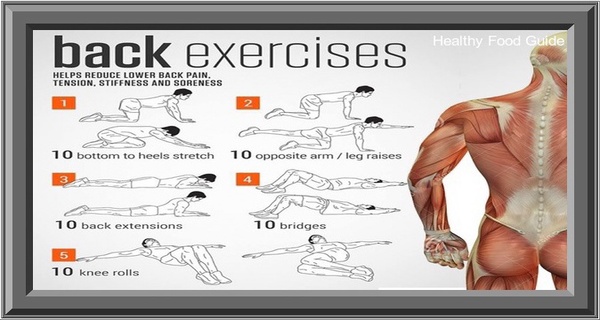
Exercises for a Healthy back
Important is exercise in preventing low back injury:
The key to preventing lower back injury and pain (LBP), whether work-related or not, is physical conditioning. “Getting into shape” involves the overall conditioning of the body and the cardiovascular system. Aerobic exercise plus the exercising of the core muscles (those of the spine and the abdomen that are responsible for stabilizing the spine), are both critical for developing healthy and pain-free backs.
Most effective for preventing low back injury:
Traditional beliefs among exercise practitioners and even rehabilitation professionals that strong back and abdominal muscles alone protect the back and reduce LBP episodes have never been validated by research or experience. It’s time to debunk that myth.
Mobility and flexibility of the lumbar region seems to be another fallacy. However, that doesn’t mean that strong and supple back muscles, if you have them, are a bad thing. Nevertheless, developing them by using exercises that are conventionally prescribed for a strong and flexible back sometimes inflicts injury. So, if neither strength nor lumbar flexibility guarantees a healthy back, then what does?
Fairly recent studies on the biomechanics of the back suggest that muscle endurance is more protective than mere strength.
Stuart McGill, a world-renowned lecturer and expert in spine function and injury prevention and rehabilitation at the University of Waterloo, Ontario, suggests instead, in his book Low Back Disorder, Evidence-Based Prevention and Rehabilitation (Human Kinetics, 2002), that stabilizing the spine seems to be the answer.
The way to achieve and maintain spinal stability is to:
- Exercise the spine’s major stabilizing muscles:
- back extensor
- abdominal muscles (the so-called “six pack”)
- abdominal muscles (the lateral obliques)
- Exercise all these muscles in a special way – by sparing the back
“Sparing” means exercising with the spine in a line with no additional load.
The focus of this document is on selecting the most appropriate types of exercises and the best way to conduct them to make you fitter without injuring yourself. Ideally you should have a set of exercises tailored to your individual objectives and ability. Because we are unable to satisfy every individual’s needs, we can suggest only a rather generic set of exercises that we hope will suit the majority of working people.
The other objective is to present exercises that everyone can do and eventually benefit from doing regularly, regardless of how deconditioned one might be at the outset.
Always consult with a doctor or medical professional before beginning any type of exercise program.
Start an exercise session:
Commencing Exercising:
Every session should begin with the “Cat-Camel” exercises (Figures 1A, 1B, and 1C)
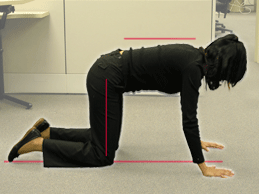
Figure 1A
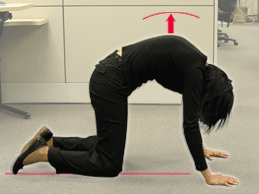
Figure 1B

Figure 1C
- Start on your hands and knees with your thighs perpendicular to the floor (Figure 1A).
- Inhale deeply and slowly with the back straight but relaxed as much as possible.
- Exhale and stretch your back by arching it upwards (arching cat position), while remaining relaxed; do not hold your breath (Figure 1B).
- Inhale deeply and slowly and come back to the starting position (Figure 1A).
- Exhale and stretch your back downwards into a swayback (camel) position (Figure 1C).
- Inhale deeply and slowly and come back to the starting position (Figure 1A).
- Repeat the whole sequence (Figures 1A, 1B, and 1C) 3 to 7 times.
Exercises are recommended for back extensors:
The so-called “Birddog” exercise is suggested for improving the back extensor muscles without overloading or straining them. The degree of difficulty of this exercise can be customized to the starting ability of the person attempting them.
A. For people with a seriously deconditioned back:
- Begin with the “all fours” position (Figure 1A).
- Lift one hand off the floor and keep it up for a few seconds if you can do so.
- Repeat the same with the other hand.
- Still from an “all fours” position lift one knee off the floor and keep it up for a few seconds if you can do so.
- Repeat the same with the other knee.
- Repeat the whole sequence: left and right hand and left and right knee a few times (up to three times) if you can do so.
B. For the average person:
Step One:
From the “all fours” position (Figure 1A):
- Breathe in.
- Squeeze your abdominal muscles.
- While exhaling, raise one arm in front of you until it is parallel to the floor; (Figure 2).
- Hold the arm extension while slowly exhaling over 4 to 7 seconds.
- Breathing in, return arm to the starting position.
- Repeat the same with the other arm.
- Alternate arms, and repeat exercise several times, up to ten (five for each arm) repetitions if you are able to do so.
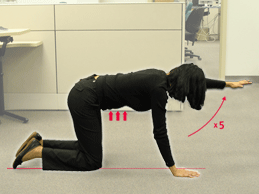
Figure 2
We suggest starting with the arm exercises because they are easier and less challenging for maintaining your balance. When you can do that easily, progress to the next step that involves raising a leg.
Step Two:
From the “all fours” position (Figure 1A):
- Breathe in.
- Squeeze your abdominal muscles.
- While exhaling, push one leg backwards and upwards until it is parallel to the floor, with the ankle in a naturally relaxed position (Figure 3).
- Hold the leg extension while slowly exhaling over 4 to 7 seconds.
- Breathing in, return your leg to the starting position.
- Throughout this whole motion look toward the floor to keep the neck in line with the spine.
- Repeat the same motion with your other leg.
- Alternate legs and repeat this exercise several times, up to ten (five for each leg) repetitions if you are able to do so.
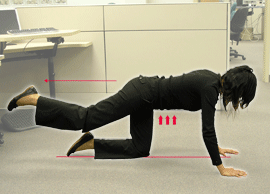
Figure 3
After mastering the alternate leg raises add another motion:
- As you are pushing your leg backwards, raise the opposite arm in front of you, until it is also parallel to the floor, without losing your balance (Figure 4).
- Hold this position while slowly exhaling over 4 to 7 seconds.
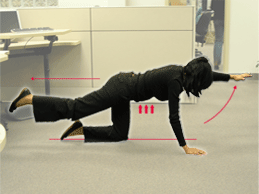
Figure 4
Important points:
- Keep your abdominal muscles mildly squeezed while raising and holding the extension of your limbs.
- Keep your spine in a line to maintain neutral spine alignment; do not raise either leg or arm above the horizontal line.
Exercises are recommended for abdominal muscles:
A common exercise for abdominal muscles is the curl-up. However, there are many ways of performing this manouevre and some of them can be harmful and injurious, especially those which involve excessive bending and twisting. One example is the exercise where additional weights are used in order to speed up the development of the impressive so-called “six pack”.
Based upon the concept of “sparing the back” endorsed by Stuart McGill we suggest the following:
Curl-up
Starting position (Figure 5A)
- Lie on the floor with your hands placed under the lumbar area to preserve a neutral spine position (Figure 5A).
- Keeping one leg flat on the floor, flex the other knee, and raise the foot off the floor until your lower leg is parallel to the floor (Figure 5B).
- Repeat 4-7 times, then switch to the other leg.
- Repeat this exercise several times, up to ten (five for each leg) repetitions if you are able to do so.
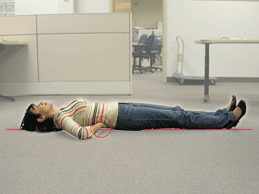
Figure 5A
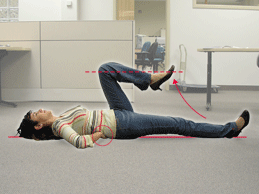
Figure 5B
- Without flattening or bending your lower back, curl up your upper body by raising your head and shoulders off the floor (Figure 6).
- If you feel any neck pain, try curling up without bending your neck.
- Otherwise, you can make the curl-up more challenging:
- by raising elbows off the floor as well
- by slightly squeezing your abdominal muscles before raising the torso
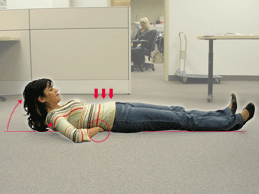
Figure 6
recommended for lateral and oblique abdominal, and lumbar muscles:
These muscles are also important in stabilizing the spine and thus preventing episodes of low back pain.
The Side Bridge – a version for the deconditioned:
Starting position (Figure 7A).
- While pivoting on the balls of your feet turn slowly toward the wall (Figure 7B), and keep turning (Figure 7C), until you acquire a position that is the mirror image of the starting one (Figure 7D).
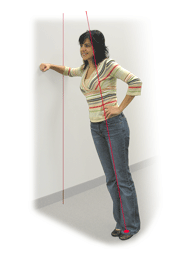
Figure 7A
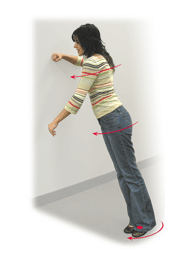
Figure 7B

Figure 7C
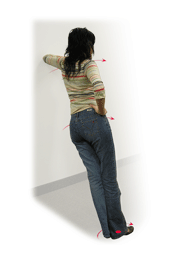
Figure 7D
Figure 8A and Figure 8B show more challenging versions of the side bridge.
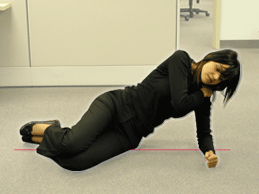
Figure 8A
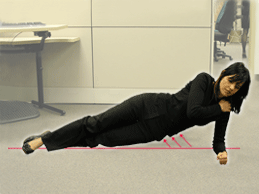
Figure 8B
Final word to the wise:
- Exercising every day, even if only for 15 -30 minutes, brings the most beneficial effects.
- Keep the effort and exertion within your own comfort zone. The phrase “no pain, no gain” does not apply — do not follow it.
- Do not exercise shortly after getting out of bed.
- Add to your back exercises by doing a gentle cardiovascular activity such walking (the best), cycling or swimming.
- Avoid exercising with additional weights. Instead, if you want to increase the intensity, increase the number of repetitions.
- Be patient and stick with it. It takes time to feel the benefits of exercising.